This page focuses only on getting your character art into the Dorian engine fast, with clear specs, a 5‑minute quick start, bulk‑upload, testing, and troubleshooting.
🌟Valid expressions:
Anxious
Blush
Bored
Delight
Disgust
Flirting
Happy
Neutral
Rage
Sad
Scared
Shock
Smile
Thinking
Wicked
🌟Character Art Specs
Format: PNG, transparent background
Resolution: 2810 × 4000 px (portrait)
One file = one sprite (pose/expression). Name your files character_expression, e.g. Julian_neutral.png
For a self-insert main-character: prepare a transparent PNG named MC_neutral.png
Tip: Keep all expressions/poses for the same character on identical canvas size and alignment of the character on the image to avoid “jitter” when switching expressions.
Quick Start: Character Upload
This method of uploading characters is the fastest, and it’s where you’ll make any quick edits to your characters going forward. We recommend trying this first, then getting familiar with the bulk uploader (below) as well. Let’s go!
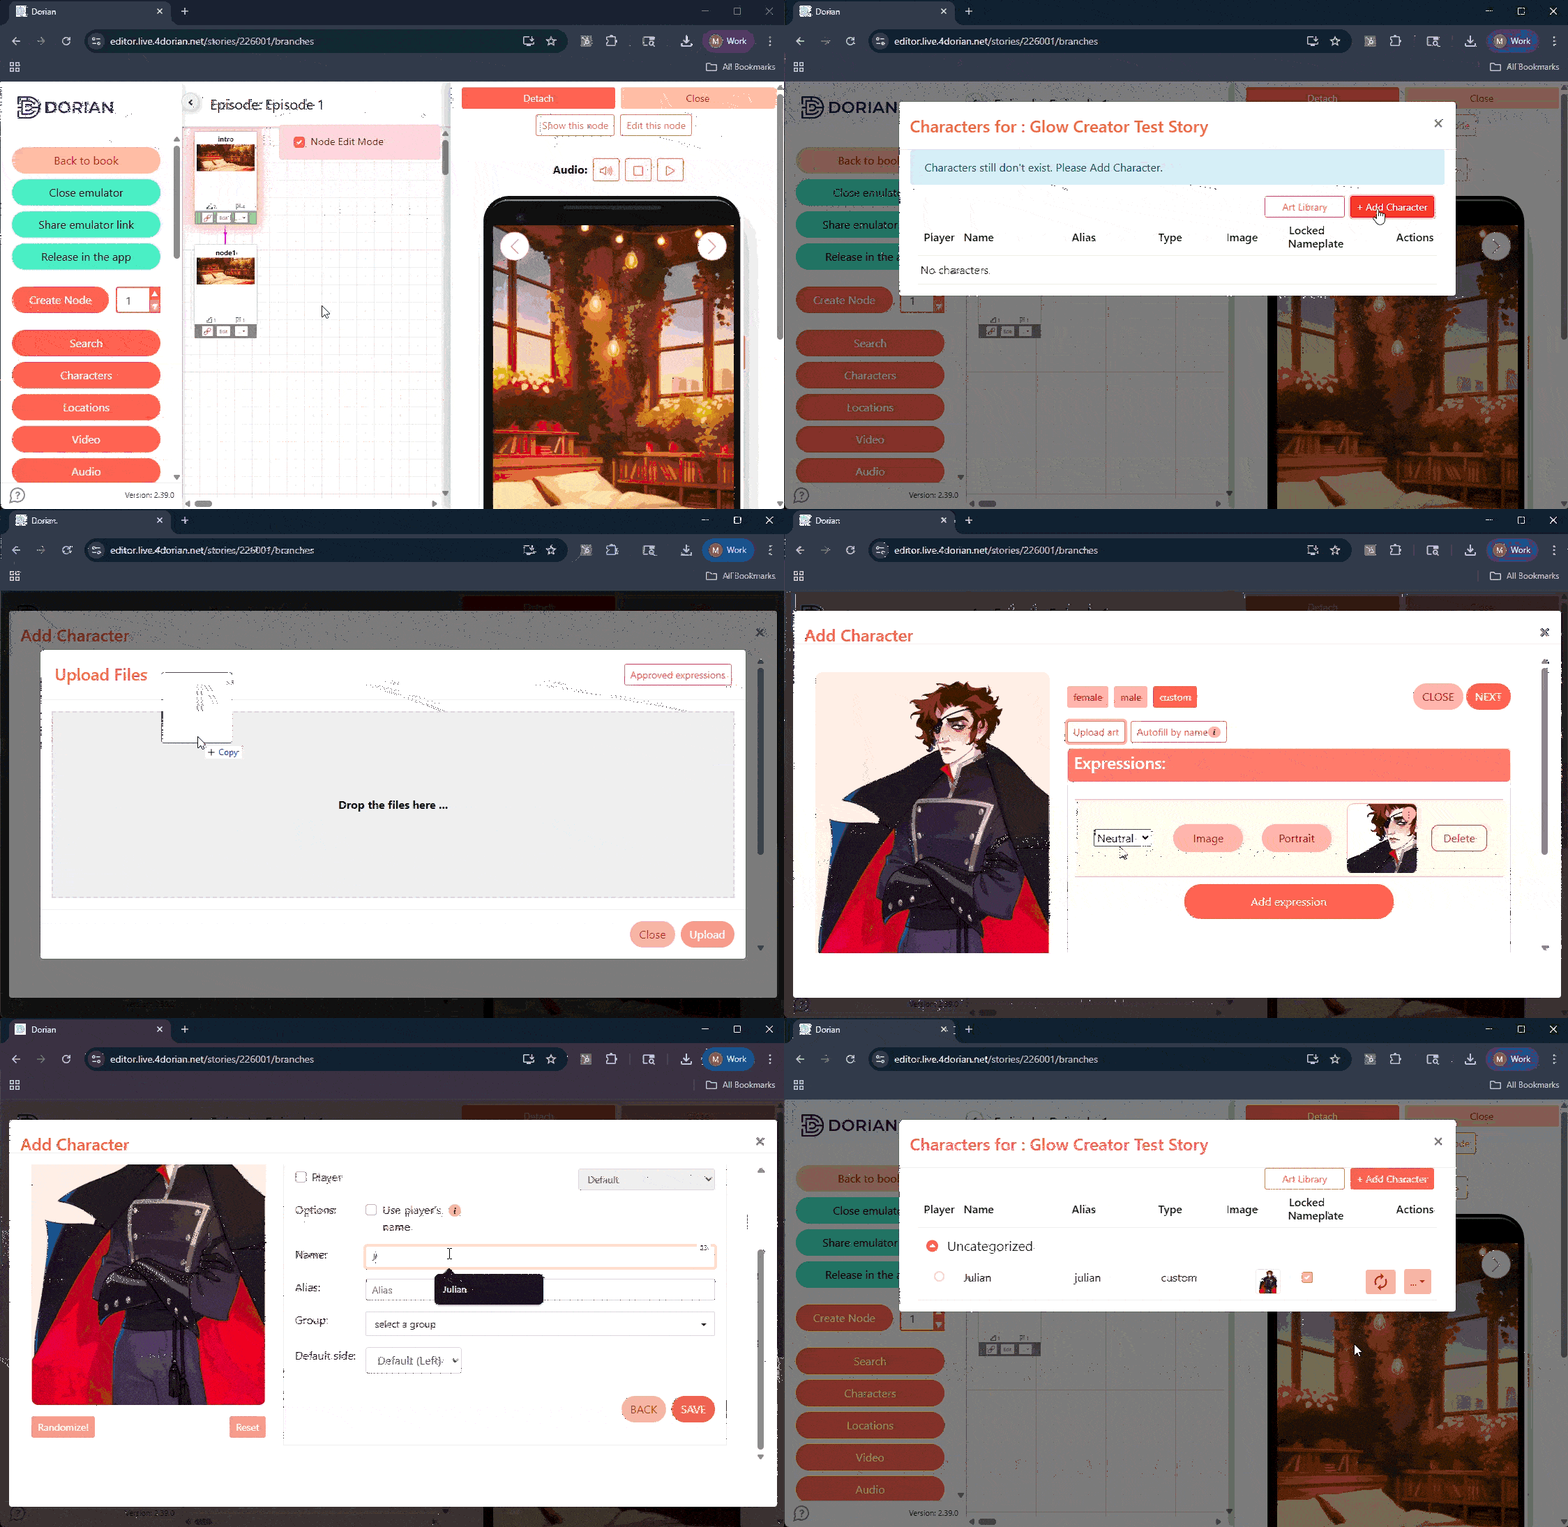
Open the web editor & navigate to your game → Characters (orange button on the left of the node editor) → +Add Character -> Custom tab in the middle of the screen -> Upload Art.
Make sure your files are PNG (2810×4000, transparent background), and named character_expression and upload. Check out the list of valid expressions to the left!
Click Next. If Next is greyed out, you may not have selected a “Neutral” expression– you need a default neutral expression to continue.
Name the character (what players will see). If this is your self-insert MC, check “Use Player’s Name,” and the name the player inputted will be shown when played.
Save. This character will now appear in your Characters button on the left going forward.
Add to a scene:
Open your episode → select a node.
Add a Dialogue, Thinking, or Reaction step.
In the step’s character picker, choose your new character and an expression.
Playtest in the Emulator (right panel). Verify the sprite appears, is framed well, and swaps correctly between steps.
Rescaling + Positioning in Engine
Resizing your characters in your own software is the easiest, but there’s an in-engine solution for minor re-scaling and positioning!
Prep all your expression files for the same character (make sure they’re the same canvas size, with the character positioned the same in each, named character_expression).
On the editor home page (NOT inside your game), click Characters on the left. Choose Upload Character Art.
Select your image to upload. You can rename them in the Character label box. Use the scale button to zoom in and out on the image. Hit Save position when you’re satisfied, then Upload.
When you upload the next expression, hit Use Saved Position to automatically place this expression to match the previous one!
Now, when you return to your game, hit the orange Characters button -> Add Character -> Autofill by name. Type in the name of the uploads you just saved via this method– perhaps you named them something like JulianZoom_neutral to differentiate. This box will filter down to everyone with JulianZoom as part of their name, and you can import them all at once and delete the expressions you don’t need.
Continue on with the same steps as above.
How do I have a transparent protagonist?
Upload the main character (MC)’s base sprite as a transparent PNG (2810×4000), meaning an empty image file with nothing in it and transparency enabled..
When you’re adding it to the Characters button, instead of typing in a name, check, check “Use Player’s Name.”
From now on, when you add the player to a Dialogue step → the UI will display the player’s chosen name. If you’re scripting with a spreadsheet, make sure to refer to the player as whatever Alias you selected for this character.
Pronouns & POV: If you support variable pronouns in writing, manage them via Memory Bank text variables; character upload itself only controls art and display name.
Common Issues & Fixes
My character isn’t showing up.
The step type may require a character (Dialogue/Thinking/Reaction) and none is selected. Pick a character + sprite.
Expression changes look jumpy.
Re‑export sprites so all expressions share the same canvas size and baseline alignment.
Sprite looks blurry.
Check the source PNG is truly 2810×4000 and not being upscale‑stretched. Export at native size.
Publishing is blocked.
The scene might have a required character missing on a step, or your episode may lack an End node. Fix validation errors shown by the editor before publishing.
How do I show a character on a line of narration?
Your game must have Arcana-style UI. Upload a second version of the character’s art and name them a blank space, with alias CharacterNarration. Then use Dialogue lines that are linked to CharacterNarration. We recommend making sure all dialogue in this style is surrounded by “quotes” to avoid confusion with lines of narration.
How do I show a character speaking on a special illustration background (meaning, don’t show their sprite, but have them speak)?
Upload a second version of your character with a transparent PNG as the art, the name set as the character’s name, and an alias like CharacterInvisible. When you refer to them as CharacterInvisible in a line of dialogue, no sprite will show.
How do I upload a custom UI screen?
Upload it as a character! You can create custom splash images, UI popups, and more on your own in Canva or Photoshop, and then upload them once they’re saved as transparent PNGs. Just add them in a Reaction step, and it’ll display your custom popup image with no text overlaid!
What Next?
Upload Backgrounds.
Set up Memories to store information about gameplay choices over time.
Try writing a script and importing via the Text Importer.

