
Creating from scratch
Want to create a game with wider branching, custom art, or other more advanced features? Look no further! You can create your vision with our powerful web engine!
Not sure where to start? Read this guide!
Logging into the engine
You can login to your account through this form. If you previously logged in on the mobile platform, you may need to trigger the “forgot password” to access your engine account. Once you log in, you will see a home page with available templates.
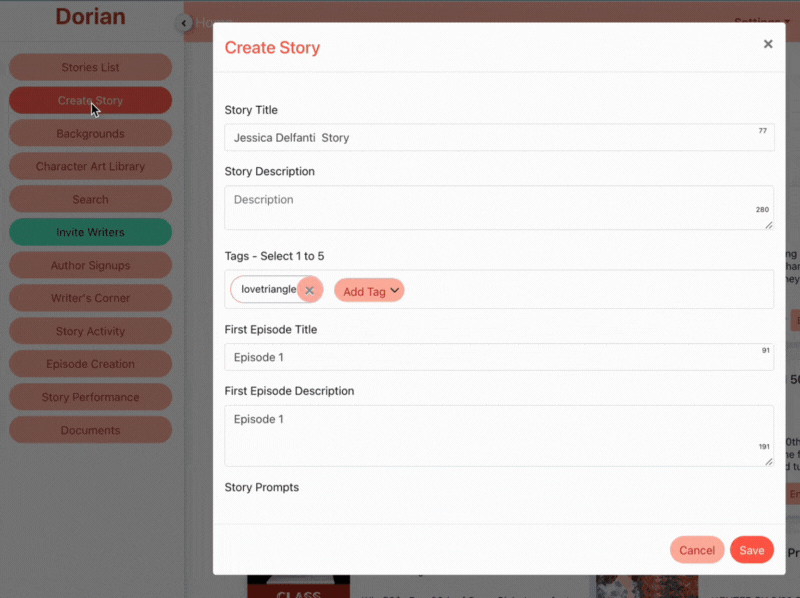
Creating a new story
To create a new story, open the engine home page. You will see a number of buttons on the left side. Click the “Create story” button.
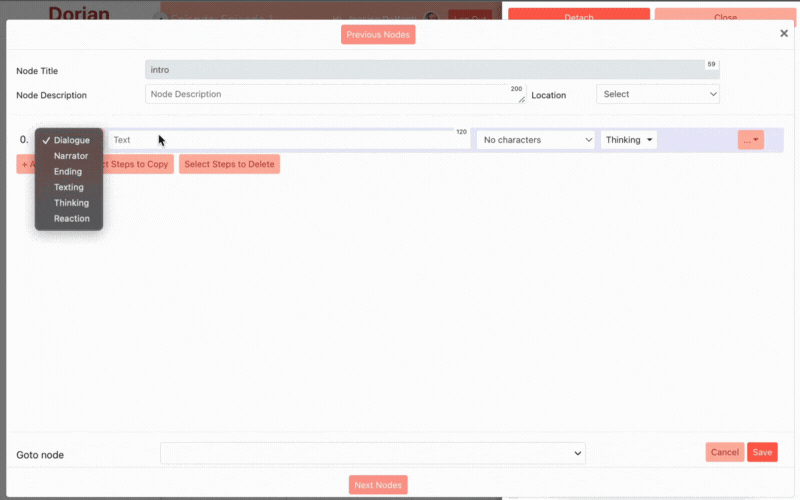
Writing a Scene
To start creating a scene, simply open the “node” and start entering your text. You can add the following step types:
Dialogue - Requires a character. Speech bubble.
Thinking - Requires a character. Thought bubble.
Narration - No character. Simple narration box.
Texting - No character. Phone frame that shows one text at a time.
Reaction - Requires a character. Character appears with expression and no text.
Adding Assets
Characters
To add characters using Dorian’s built-in character generator, navigate to the “characters” button and use the various options to customize your character.
To set the character as the “Player”, check the box when you are saving.
Backgrounds
To add characters using Dorian’s existing library, navigate to the “backgrounds” button and use the various options to customize your character.
The first background you add will be marked as your “default.” This will be automatically added to your nodes.
Looking to upload your own custom characters and backgrounds? Apply for access and check out our guide on uploading art!
Adding a Choice
Choices require their own nodes. Create a new node, then set the step type to “Choice.” You can have up to 3 options in your choice.
Adding Bonus Scenes
If you want to make money on Dorian, you need to add choices with a heart cost. These are bonus scenes.
You can add a price to your choice by using the Price drop down.
Want to show your fans that a premium choice has a large extra scene? Use the Bonus Scene modifier to create an attractive highlight!
Adding an Ending Node
Every game requires an ending node. Add a new node at the end of your script and set the type to Ending. Only Ending steps can exist within an Ending node.
FAQ
Why can’t I make my intro node a choice?
Every game requires 1 intro node that starts the story. If you want to start your game with a choice, just use the intro node to make a single title slide, then create a new node for your choice.
How do I connect nodes to each other?
You will notice a small link icon on the lower left of the node. Simply click this to generate an arrow you can connect to other nodes!
Can I copy/delete multiple nodes at a time?
Yes! Simply highlight the nodes, then close the emulator and use the control for duplication. Check the gif below to see how.
Can I remember choices?
At this time, choice memory is not supported. This feature is coming soon!
How much should I charge for my bonus scenes?
How do I design great bonus choices?
How do I know if my game is good?

💡 Dorian players have control over how their avatars look! They can choose to play with the character you designed, bring their own generated character instead, upload a custom art character, or use a transparent character.


Creating a Cover on Dorian!


Keep in mind that covers will look different depending on the size of a person's phone. For example, you can see the way this cover looks on an iPhone 12 and an iPhone 7Plus.
When designing your cover, you should ensure it is wide enough to cover wider screen formats, but make sure the visual elements are centered so slimmer phones will not have cut off content.
The above cover is W 500 px by H 801 px. You can use the following guide to design your covers so they allow for UI elements.
You can use this template directly at this link!
Just drop your cover into the purple area and then delete the overlays when you're ready to save!